Intrigued by the elegance of a well-crafted bow? The ability to sketch a bow, whether for fashion, decoration, or pure artistic expression, is a surprisingly accessible skill, perfect for beginners and children alike.
This article is designed as a comprehensive guide, suitable for everyone. Whether you're a budding artist, a craft enthusiast, or simply looking for a relaxing activity, learning to draw a bow offers a rewarding experience. We'll explore various techniques, from basic shapes to adding intricate details, ensuring you gain the confidence to create your own stunning bow drawings.
The information provided is not about a person, so here's a table with details about drawing a bow.
| Category | Details |
|---|---|
| Objective | To learn the steps and techniques for drawing various styles of bows, from simple to complex, using basic art supplies. |
| Target Audience | Beginners, children, art enthusiasts, and anyone interested in learning to draw bows for personal enjoyment, clothing design, or gift decoration. |
| Materials Needed | Sketchbook, pencil, micron pen (or similar fine-liner), color markers or colored pencils. |
| Basic Steps (Simplified) |
|
| Techniques to Learn |
|
| Tips for Success |
|
| Example Bow Styles |
|
| Advanced Techniques |
|
| Real-World Applications |
|
| Additional Information | This tutorial is designed for beginners and children, offering step-by-step instructions and tips to draw various bow styles. The process of drawing bows may be divided into sections, for instance: "middle part", "draw on both sides of the bow". This way you can use this tutorial easily to create a bow for clothing, decoration, or gifts. |
| External Reference | Search Results for 'How to Draw a Bow' |
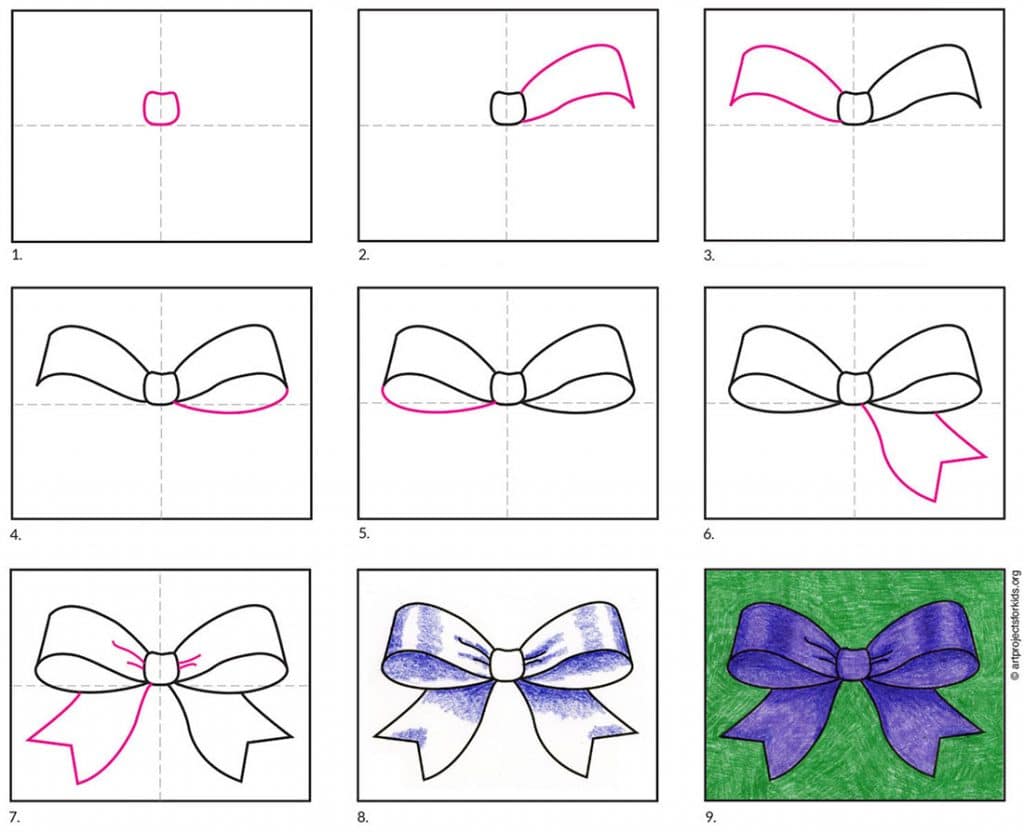
To embark on this artistic journey, gather your supplies: a sketchbook, a pencil for sketching, a micron pen or fine-liner for outlining, and some color markers or colored pencils to bring your bows to life. You don't need expensive tools; the key is practice and a little creativity. The tutorial will guide you through sketching the fundamental forms, refining the loops and tails, and adding shading and texture to create realistic and elegant bows. You can learn how to draw a bow with nine simple steps and a detailed explanation.
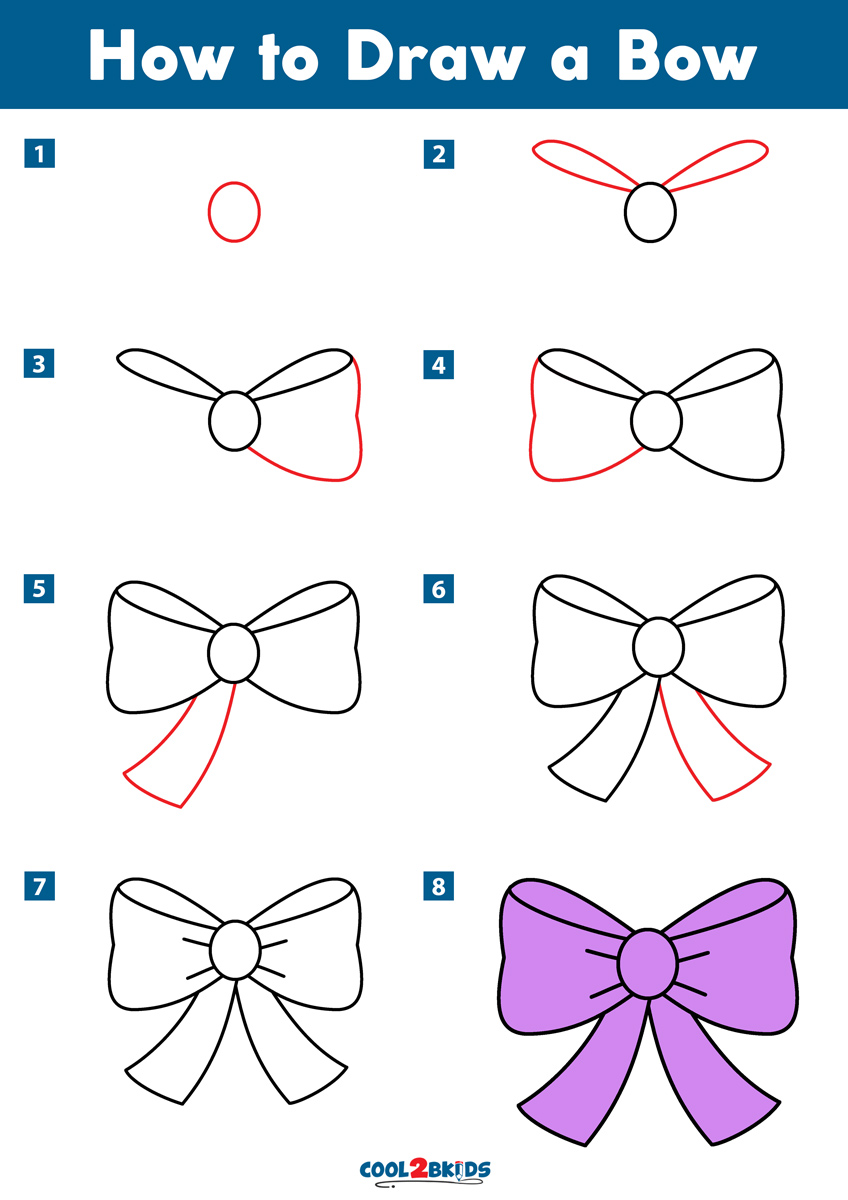
Let's begin with the basics. You can learn how to draw different styles of bows with easy steps and tips. Start by sketching the fundamental shapes of the bow. The basic structure can begin with a simple loop, rectangle, or guidelines to ensure symmetry. As you move forward, define the loops and tails. This step involves shaping the curves of the bow. Experiment with different loop sizes and the length of the tails to create variety.
Once the basic shape is defined, it's time to add the central knot or the part where the ribbon folds and ties together. Add the ribbon ends on the right and the left. Follow the instructions to create a symmetrical and elegant bow with loops, tails, and color. Then, add details that make the bow look realistic or fancy. Add wrinkles to make it more lifelike. Then, trace and color the shadows with dark crayon. Add ribbon end on the left and the wrinkles.
Shading is crucial for adding depth and dimension to your bow. Use the side of your pencil tip to shade in the sides of the bow. To enhance the realism of your drawing, use the side of the pencil tip to shade in the sides of the bow and add wrinkles to the fabric, creating an impression of folds and volume. Practice different shading techniques to achieve diverse effects. Whether you opt for soft gradients or crisp, defined shadows, the technique employed has the potential to transform your drawing.
To create a compound bow, you should study the modern bows, like compound bows, have additional components like cams and pulleys. The fundamental steps for drawing a compound bow involve sketching the basic shape, refining the limbs and cams, and adding details. Drawing a bow correctly involves several steps, each of which plays a crucial role in your shooting accuracy. First, nock the arrow onto the bowstring securely. Then, grip the bow with a relaxed yet firm hold, ensuring your fingers are correctly positioned.
For simple bows, the basic steps can be summarized as follows: Draw the center of the bow. Start the top of the right loop. Match with the same shape on the left. Draw the bottom of the loop on the right. Draw the bottom of the loop on the left. For children, this easy drawing lesson is perfect to follow along with and create a cute accessory for gifts or anything. When you have reached your anchor point, your bow is at full draw. From that point, you can start aiming and fire the bow.
Remember to start with light pencil sketches, which enable easy correction of errors. For a professional finish, once you've finalized your drawing, try outlining the bow and arrow in a black pen. Practice regularly to master the art of drawing bows.
Drawing a bow involves more than just replicating its shape; it demands an understanding of its structure and how light interacts with its surfaces. This is where the shading and texture come in. To shade the sides of the bow, you can use the side of your pencil tip. For the loops and tails, create the impression of folds and volume. Whether you choose soft gradients or crisp, defined shadows, the technique employed can transform your drawing. Consider the play of light and shadow on the fabric, and how the material folds and gathers. This adds a realistic touch to your artwork.
You can learn to draw a bow with basic shapes, guidelines, and details. Follow the easy steps and tips to create a realistic and artistic bow drawing. To add color, you can use markers or colored pencils. Using your drawing tools, such as the side of a pencil to add shadows on the sides of the bow, use these tools to shade your drawing, to make it more lifelike. Experiment with different colors to bring life to your creations.
If you're aiming for a more detailed look, modern bows, such as compound bows, have additional components like cams and pulleys. When you draw the bow, you should be using your back. Drawing below the chin helps you to move the draw scapula around the body and into alignment in a way which allows you to use the lower back muscles properly, rather than the upper traps.
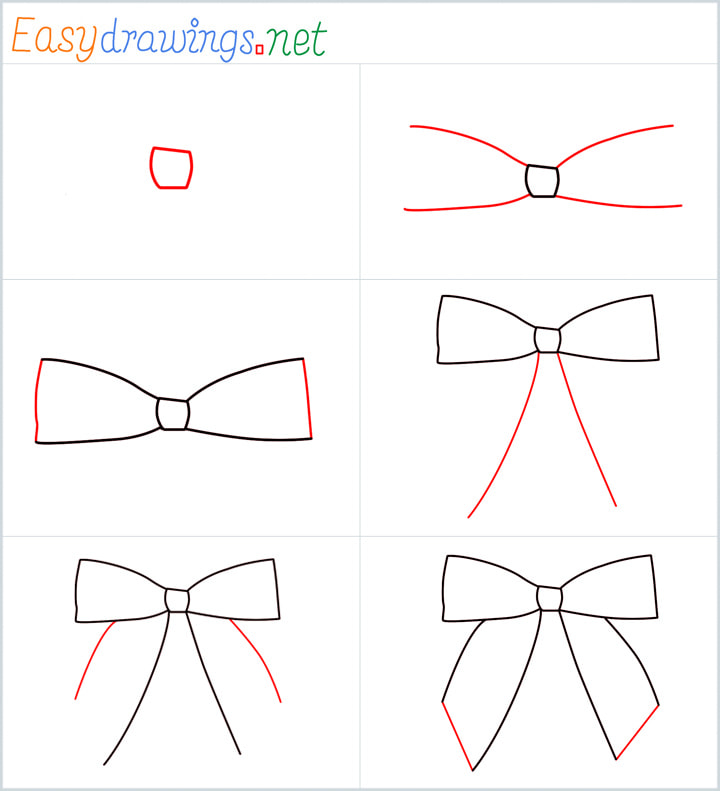
The process of drawing bows may be divided into sections, for instance: "middle part", "draw on both sides of the bow". The fundamental steps involve sketching the basic shape, refining the limbs and cams, and adding details. The materials needed are the same: sketchbook, a pencil, a micron pen, and some color markers. You can learn how to draw a bow with this easy and detailed tutorial.
The tutorial is designed for beginners and children, offering step-by-step instructions and tips to draw various bow styles. This easy drawing lesson is perfect for kids of all ages to follow along with and create a cute accessory for gifts or anything. To draw your bow, you should be using your back.
Drawing below the chin helps you to move the draw scapula around the body and into alignment in a way which allows you to use the lower back muscles properly, rather than the upper traps. The main part is to sketch the basic shape, refine the loops and tails, and add shading and texture to create a realistic and elegant bow. Also, follow the instructions to create a symmetrical and elegant bow with loops, tails, and color. While you are drawing your bow, you should keep your bow arm straight (the arm you hold the bow with).
To get started with drawing a bow, make sure you have the right materials. You don't need expensive or advanced tools to create a great drawing. Learn to draw a beautiful bow with ease! Follow the steps to make the loops, tails, knot, and fabric of the bow, and add details to make it look realistic or fancy. For simplicity, we will focus on the traditional bow. You can also learn how to draw a bow with this fun and easy guide.
If you are going to draw a bow, follow the steps to make the loops, tails, knot, and fabric of the bow, and add details to make it look realistic or fancy. Modern bows, such as compound bows, have additional components like cams and pulleys. You can also see examples of simple and fancy bows, and how to add color and outline to your drawings. The steps are to sketch the basic shape, refine the loops and tails, and add shading and texture to create a realistic and elegant bow. You can also add details to make it look realistic or fancy. For simplicity, we will focus on the traditional bow.
The key is to experiment with different bow styles. You should keep your bow arm straight (the arm you hold the bow with). Follow the easy steps and tips to create a realistic and artistic bow drawing. You will need a sketchbook, a pencil, a micron pen, and some color markers to create your own pretty bows. You can also learn how to draw a bow with this simple and easy tutorial. You can also see examples of simple and fancy bows, and how to add color and outline to your drawings.
To draw your bow, you should be using your back. It helps to draw slightly under the chin before coming to full draw. Drawing below the chin helps you to move the draw scapula around the body and into alignment in a way which allows you to use the lower back muscles properly, rather than the upper traps. The aim is to start the top of the right loop, then match it with same shape on the left. Then, draw the bottom of the loop on the right. Then, draw the bottom of the loop on the left. Learn how to draw a cute bow step by step with this video tutorial by draw so cute.
After the bottom loop, add the ribbon end on the right. Add ribbon end on the left and the wrinkles. Trace and color the shadows with dark crayon. Draw lightly to begin with in case you need to erase, but once you've finished your drawing, try outlining the bow and arrow in black pen or pressing harder with a pencil to make them stand out. The bow will be ready. You can add the ribbon end on the left and the wrinkles.
The next step is to draw the center of the bow. The materials needed are: a sketchbook, a pencil, a micron pen, and some color markers. Materials needed for drawing a bow. Learn how to draw a bow with this easy and detailed tutorial. First, you will need a sketchbook, a pencil, a micron pen, and some color markers to create your own pretty bows. Learn how to draw different styles of bows with easy steps and tips.
You can follow these simple steps, which are perfect for kids of all ages to follow along with and create a cute accessory for gifts or anything. You can start the top of the right loop, and draw the bottom of the loop on the left. All drawing bow is ready; follow the steps and get the appropriate drawing. Then, draw the bottom of the loop on the left. How to draw a bow in stages (1 option) we draw the middle part, which overtills the ribbon, then draw on both sides of the bow.
Next, you will draw the center of the bow. The steps include sketching the basic shape, refining the loops and tails, and adding shading and texture to create a realistic and elegant bow. Add details to make it look realistic or fancy. The instructions are to create a symmetrical and elegant bow with loops, tails, and color. You can add the ribbon end on the left and the wrinkles.
To create a compound bow, you should study the modern bows, like compound bows, have additional components like cams and pulleys. When you draw a bow, you should be using your back. You can also see examples of simple and fancy bows, and how to add color and outline to your drawings. You can add the ribbon end on the left and the wrinkles. How to draw a bow in pencil. From above on each side we draw a curve, from the core we show folds. Materials used: pencil black pen colour pencils subscribe to this channel to get.
Remember that drawing below the chin helps you to move the draw scapula around the body and into alignment in a way which allows you to use the lower back muscles properly, rather than the upper traps. Follow the instructions to create a symmetrical and elegant bow with loops, tails, and color. The aim is to start the top of the right loop, then match it with same shape on the left. Then, draw the bottom of the loop on the right. Then, draw the bottom of the loop on the left. Learn how to draw a cute bow step by step with this video tutorial by draw so cute.
To draw the bow, you start pulling the bow towards your anchor point. Once you've finished your drawing, try outlining the bow and arrow in black pen or pressing harder with a pencil to make them stand out. Use the side of the pencil tip to shade in the sides of the bow to make your drawing more lifelike. This easy drawing lesson is perfect for kids of all ages to follow along with and create a cute accessory for gifts or anything. You will need a sketchbook, a pencil, a micron pen, and some color markers to create your own pretty bows.
Dry fires can wreck your bow (without an arrow loaded, the bow's riser, limbs, and cams take the brunt of. Then, you will draw the center of the bow. Start the top of the right loop. Match with same shape on the left. Draw the bottom of the loop on the right. Draw the bottom of the loop on the left. Add the ribbon end on the right. Add ribbon end on the left and the wrinkles. Trace and color the shadows with dark crayon. Draw lightly to begin with in case you need to erase, but once you've finished your drawing, try outlining the bow and arrow in black pen or pressing harder with a pencil to make them stand out.
To complete the drawing process: add the ribbon end on the left and the wrinkles. And, from below we draw the ends of the ribbon. You can add the ribbon end on the left and the wrinkles. All drawing bow is ready; follow the steps and get the appropriate drawing. Learn how to draw a bow with this fun and easy guide. To draw your bow, you should be using your back
Before you start, nock the arrow onto the bowstring securely. Then, grip the bow with a relaxed yet firm hold, ensuring your fingers are correctly positioned. Learn how to draw a bow with this simple and easy tutorial. You will need a sketchbook, a pencil, a micron pen, and some color markers to create your own pretty bows.